Getting started with the CLI
The Trakka CLI is a command-line interface for interacting with the Trakka platform. To use it, you will need an account which grants the relevant roles and permissions in any organisation or project you wish to interact with.
The CLI can be used for several purposes, including:
- Submitting sequence data
- Submitting metadata (sample, sequence and epidemiological metadata)
- Retrieving data for analysis
- Uploading analysis results (trees and analysis-derived metadata)
- Trakka system-level administrative tasks
The CLI source code can be found at https://github.com/AusTrakka/austrakka2-cli , and the Python package overview at https://pypi.org/project/trakka/ .
Installation
The instructions below refer will to an AT_URI environment variable, which should be set to the URL of your Trakka
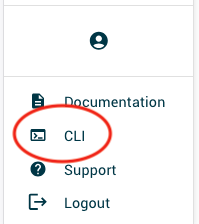
instance. You can find this URL in the web interface by clicking on the CLI button in the left sidebar, as shown.
Standalone CLI installation - Linux only
Currently only supported on Linux:
curl -o- https://raw.githubusercontent.com/AusTrakka/austrakka2-cli/refs/heads/master/scripts/install | bash
This will install trakka to ~/.local/bin. You can pass a custom directory like this:
curl -o- https://raw.githubusercontent.com/AusTrakka/austrakka2-cli/refs/heads/master/scripts/install | bash -s [OTHER_DIR]
Using Python
Install into a conda environment (optional but recommended)
Using conda allows you to install Python, install the CLI, and save the necessary environment variables, and can be used on Mac, Windows, or Linux.
-
Install either Miniforge (https://conda-forge.org/download/) or Miniconda (https://docs.conda.io/en/latest/miniconda.html). We recommend Miniforge for most users.
-
Find the correct value of
AT_URIfor your Trakka. You can find this URL in the Trakka web interface by clicking on theCLIbutton in the left sidebar (see screenshot above). -
Run the following lines, first substituting your
AT_URIvalue for[URL]inAT_URI=[URL]. Note you will not need the square brackets. For instance, if your value were https://example.trakka.site, you would substitute in the lineconda env config vars set AT_URI=https://example.trakka.site.
conda create -n trakka python=3.12
conda activate trakka
python -m pip install trakka
conda env config vars set AT_URI=[URL]
mkdir -p "${CONDA_PREFIX}/etc/conda/activate.d"
echo "alias at-login=\"export AT_TOKEN=\\\$(trakka auth user)\"" > ${CONDA_PREFIX}/etc/conda/activate.d/trakka-alias.sh
Note that the last two lines are valid only for Linux/Mac and will not work on Windows. These lines create an alias at-login
in the conda environment, which will log you in to the CLI.
You can then use
conda activate trakka
at-login
in order to use the CLI. See User Authentication below for alternative login methods.
Install without conda
If you are using Windows, and are not a WSL or Powershell user, it is strongly recommended to use conda (see above).
To install without conda, simply install with
python -m pip install trakka
You will need to set the environment variable AT_URI, as described above.
You can do this by running:
Mac / Linux
export AT_URI="[URL]"You may wish to add this to your
.bashrcor.zshrcfile.
Windows: Powershell
$Env:AT_URI = "[URL]"
To use the CLI, you must log in by setting the AT_TOKEN environment variable using the
trakka auth user command (see User Authentication, below).
Mac / Linux
You may wish to configure a login command for convenience:
alias at-login="export AT_TOKEN=\$(trakka auth user)"You may wish to add this to your
.bashrcor.zshrcfile.
Windows: Powershell
You may wish to configure a login command for convenience:
Function at-login { $Env:AT_TOKEN = trakka auth user }You may wish to add this to your
config.ps1file.
Updating the CLI
Standalone CLI
Run the same command as in the install section to install the updated standalone CLI.
Python
If you have installed the CLI into a conda environment, you should first activate it with conda activate trakka,
and then run the command to update:
conda activate trakka
python -m pip install --upgrade trakka
If you are using Python without a conda environment, or managing environments yourself, you can run:
python -m pip install --upgrade trakka
Logging in
Before you can use the CLI, you must log in as described below, to allow the CLI to use your Trakka credentials. Your authorisation will expire after a period and you will need to log in again.
User Authentication
Most users will want to log in to the CLI this way.
For any of these methods, you should be directed to log in via a browser and enter a code to authorise the CLI. This browser-based login uses your institutional credentials, i.e. the same credentials you use to log in to the Trakka web interface, and will authenticate you via your institution's identity provider.
Mac / Linux
If you have configured a login command as described above, you can simply run
at-loginOtherwise, you will need to set the
AT_TOKENenvironment variable. In a Mac or Linux environment you can run:export AT_TOKEN=$(trakka auth user)
Windows: Powershell
$Env:AT_TOKEN = trakka auth user
Windows: Cmd
Set the
AT_TOKENenvironment variable by first runningtrakka auth userto obtain a token string, and then running
set AT_TOKEN=<output of previous command>:w to set the environment variable.
Process Authentication
This authentication mode is intended for long-term automated processes. Most users will not need it.
To authenticate a process, you'll need to set the following environment variables:
AT_AUTH_PROCESS_ID
AT_AUTH_PROCESS_SECRET
Values for AT_AUTH_PROCESS_ID and AT_AUTH_PROCESS_SECRET will be provided to you by the Trakka team. Note that the secret value is sensitive.
Once these variables are set, run the following to authorise:
Mac/Linux
export AT_TOKEN=$(trakka auth process)
Windows: Powershell
$Env:AT_TOKEN = trakka auth process
Windows: Cmd
Set the
AT_TOKENenvironment variable by first runningtrakka auth processto obtain a token string, and then running
set AT_TOKEN=<output of previous command>to set the environment variable.
Using the CLI
The CLI has a subcommand structure. Run
trakka -h
to see available subcommands.
Run e.g.
trakka metadata -h
to see available commands to manipulate metadata.
Run e.g.
trakka metadata add -h
to see the usage of the metadata add command to upload metadata files.